IMovie How To Export As MP4: The Ultimate Guide For Everyday Editors
So listen up, my fellow video creators! You’ve been working hard on your masterpiece in iMovie, and now it's time to share it with the world. But wait, how do you export your project as an MP4 file? That’s where this guide comes in, and trust me, it’s gonna save you a ton of headaches. Exporting your iMovie project as an MP4 is super important if you want to upload it to platforms like YouTube, Vimeo, or even share it with friends and family. Let’s dive right into it, shall we?
Now, I know what you're thinking. "Isn’t exporting just a simple click of a button?" Well, yes and no. While the process itself is straightforward, there are some key steps and settings you need to be aware of to ensure your video looks its best. Whether you're a beginner or someone who’s been using iMovie for a while, this guide will walk you through everything you need to know about exporting your project as an MP4 file.
Before we get started, let’s talk about why exporting as MP4 is so crucial. MP4 is one of the most widely used video formats out there, and it’s compatible with pretty much every device and platform. This means you won’t have to worry about your video not playing on someone else’s phone or computer. Plus, it offers great video quality without taking up too much space. So, let’s get down to business and learn how to export your iMovie project like a pro!
- Damon Wayans Wife Lisa The Ultimate Guide To Their Love Story
- Samantha Speno Age The Rising Star You Need To Know About
Why MP4 is the Format You Need
Alright, let’s break it down. Why should you choose MP4 over other formats? Let me tell you, MP4 is like the golden child of video formats. It’s lightweight, which means it won’t take up too much storage space, but at the same time, it delivers top-notch video and audio quality. That’s why it’s the go-to format for sharing videos online or transferring them between devices.
Here’s the deal: MP4 uses advanced compression techniques that allow it to maintain high quality while keeping file sizes relatively small. This makes it perfect for sharing on social media, embedding on websites, or sending via email. Plus, it’s compatible with almost every device and platform out there. Whether you’re using a Mac, Windows, Android, or iOS device, MP4 will play without any issues.
Let’s not forget about the audio side of things. MP4 supports multiple audio tracks, including stereo and surround sound, which is great if you’re working on a project with complex sound design. It also supports subtitles and captions, making it accessible to a wider audience. In short, MP4 is versatile, efficient, and reliable, which is why it’s the preferred format for most video creators.
- Meet Andre Hakkaks Wife The Untold Story Behind The Scenes
- Niall And Saras Matter Wedding A Love Story To Remember
Getting Started with iMovie
Now that we’ve established why MP4 is the way to go, let’s talk about iMovie. If you’re reading this, chances are you’re already familiar with iMovie, but for those who aren’t, here’s a quick rundown. iMovie is a powerful yet user-friendly video editing software that comes pre-installed on most Macs. It’s perfect for beginners and pros alike, offering a wide range of features to help you create professional-looking videos.
One of the best things about iMovie is how easy it is to use. You don’t need to be a tech wizard to figure it out. The interface is intuitive, and the tools are straightforward. From adding transitions and effects to adjusting audio levels and applying filters, iMovie has got you covered. And the best part? It’s completely free!
Before we dive into the exporting process, make sure your project is all set and ready to go. Double-check your clips, transitions, and effects to ensure everything looks and sounds the way you want it to. Once you’re satisfied with your project, it’s time to move on to the next step.
Preparing Your iMovie Project for Export
Alright, so you’ve finished editing your video, and it’s looking great. But before you hit that export button, there are a few things you should do to prepare your project. First, take a moment to review your entire video from start to finish. Look out for any glitches, awkward transitions, or audio issues. You don’t want to export your project only to realize later that something’s off.
Next, organize your clips and assets. If you’ve been working on your project for a while, chances are your timeline is a bit messy. Take a few minutes to tidy things up. Delete any unused clips, adjust your transitions, and fine-tune your audio levels. This will not only make your project look better but also help reduce the file size of your exported video.
Lastly, consider the resolution and aspect ratio of your video. Are you exporting for YouTube? Vimeo? Or maybe just for personal use? Depending on where you plan to share your video, you might need to adjust these settings. For example, if you’re uploading to YouTube, a resolution of 1080p or 4K with a 16:9 aspect ratio is ideal. On the other hand, if you’re sharing on social media, you might want to go with a square or vertical format.
Step-by-Step Guide to Exporting as MP4
Now that your project is all set, it’s time to export it as an MP4 file. Don’t worry, it’s not as complicated as it sounds. Follow these simple steps, and you’ll have your video ready to share in no time.
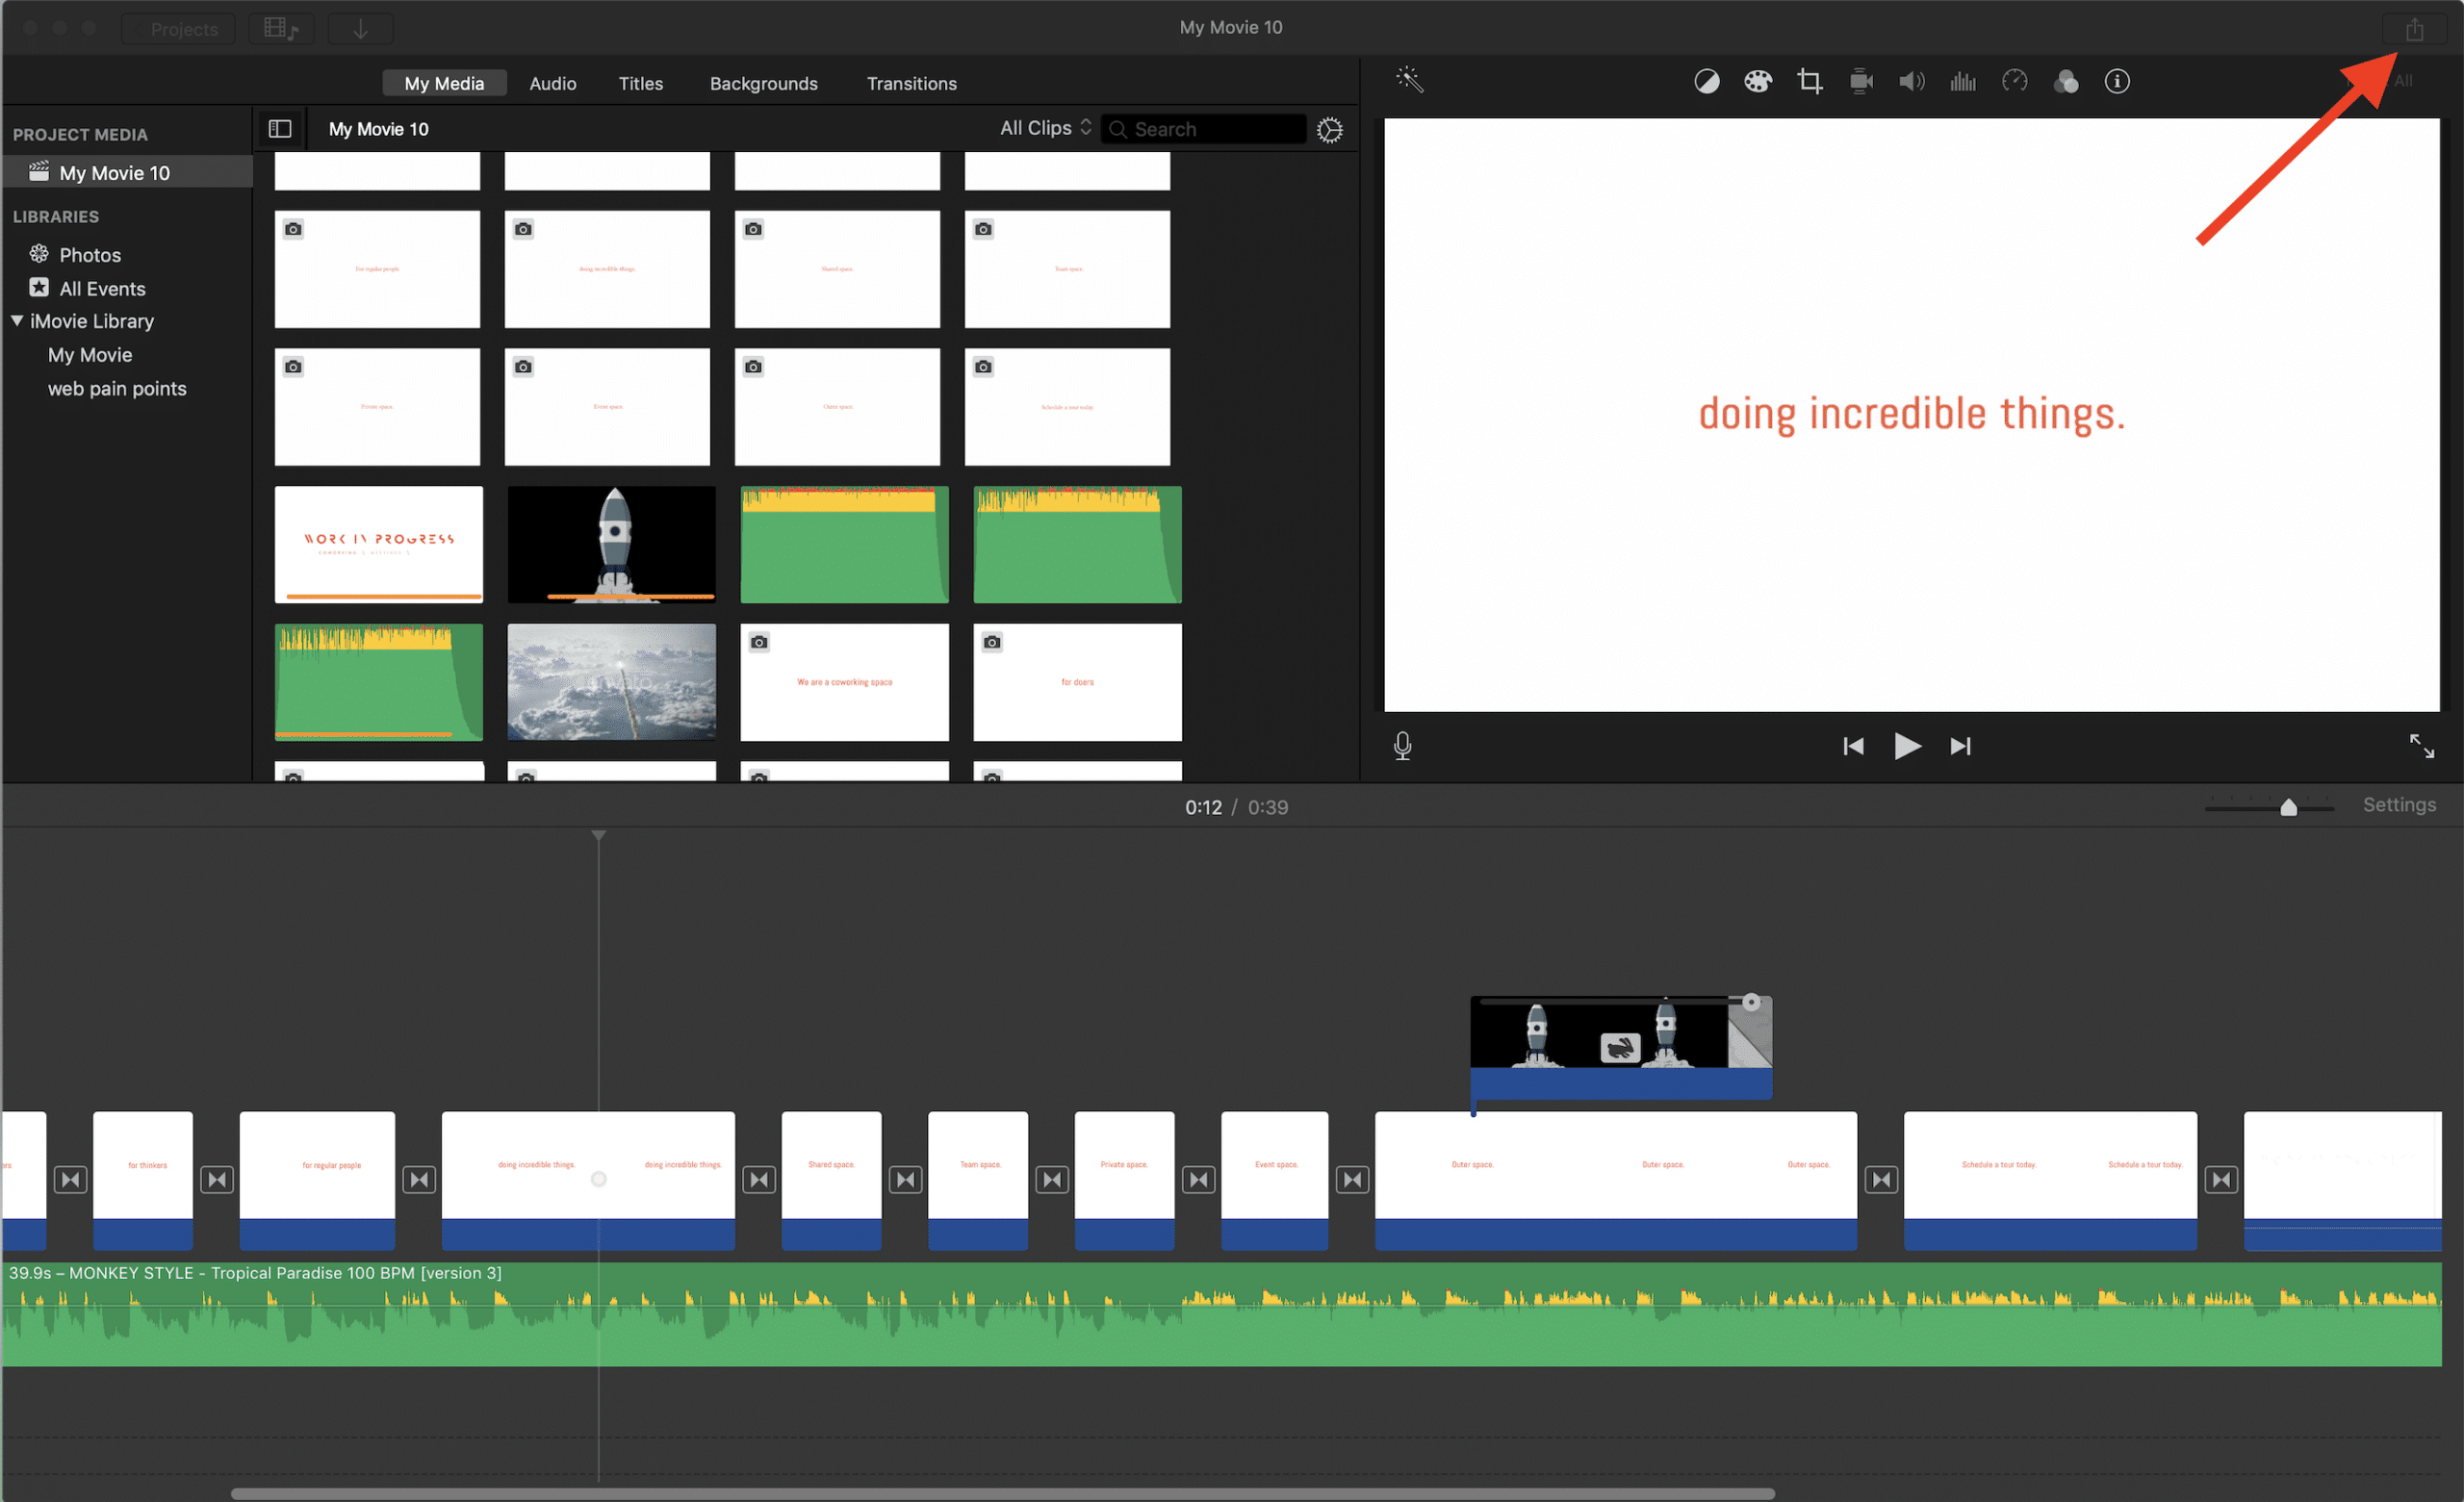
- Open your iMovie project and make sure everything is where it should be.
- Go to the top menu and click on "File," then select "Share."
- From the dropdown menu, choose "File." This will open a new window with export options.
- In the export window, select "MP4" as your file format. You’ll see this option under the "Kind" dropdown menu.
- Adjust the quality settings. You can choose from Low, Medium, High, or Maximum. For most purposes, High or Maximum is recommended.
- Set the resolution and frame rate. Again, this depends on where you plan to share your video. For YouTube or Vimeo, 1080p at 30fps is a good choice.
- Click "Next" and choose a location to save your file. Give it a descriptive name so you can easily find it later.
- Finally, click "Export" and wait for the process to complete. Depending on the length and complexity of your video, this might take a few minutes.
And that’s it! Your video is now exported as an MP4 file and ready to share with the world. Easy peasy, right?
Tips for Optimizing Your Export Settings
While exporting your video, there are a few things you can do to optimize the settings and ensure your video looks its best. Here are some tips:
- Resolution: As mentioned earlier, 1080p or 4K is ideal for most platforms. However, if you’re sharing on social media, consider using a lower resolution to reduce file size.
- Frame Rate: Stick to 30fps for most videos. If you’re working on something action-packed, you might want to go with 60fps for smoother motion.
- Bitrate: A higher bitrate means better quality but also larger file sizes. For most purposes, a bitrate of 5-10 Mbps should suffice.
- Audio Settings: Make sure your audio is clear and balanced. You can adjust the volume levels in iMovie before exporting.
- File Size: If you’re worried about file size, consider lowering the resolution or using a lower bitrate. Just keep in mind that this might affect the quality of your video.
By tweaking these settings, you can strike the perfect balance between quality and file size, ensuring your video looks great without taking up too much space.
Common Issues and How to Fix Them
Even the best of us run into issues from time to time. Here are some common problems you might encounter while exporting your iMovie project as an MP4 file and how to fix them.
Problem 1: Exporting takes forever. If your export process is taking longer than expected, it could be due to a large file size or high resolution. Try lowering the resolution or using a lower bitrate to speed things up.
Problem 2: The video quality is poor. This usually happens when the bitrate is too low or the resolution is set too high. Increase the bitrate or lower the resolution to improve quality.
Problem 3: The audio is out of sync. This can happen if your audio tracks are not properly aligned. Go back to your project and double-check your audio settings. Make sure everything is lined up correctly before exporting.
Problem 4: The file won’t play on certain devices. This might be due to incompatible settings. Make sure you’re using the correct resolution, frame rate, and bitrate for the platform or device you’re sharing with.
Advanced Exporting Techniques
For those who want to take their exporting skills to the next level, here are a few advanced techniques you can try:
- Custom Presets: Create your own export presets to save time and ensure consistency across projects.
- Batch Exporting: If you have multiple projects to export, use batch exporting to save time and effort.
- Color Grading: Apply color grading before exporting to enhance the visual appeal of your video.
- Audio Enhancement: Use audio plugins or external software to enhance the sound quality of your video.
These techniques might require a bit more effort, but they can make a huge difference in the final quality of your video.
Understanding MP4 File Settings
Let’s talk a bit more about the settings you can adjust when exporting as an MP4 file. Understanding these settings will help you make informed decisions and ensure your video looks its best.
Resolution: As we’ve discussed, resolution determines the size and clarity of your video. Higher resolutions like 1080p and 4K offer better quality but result in larger file sizes.
Frame Rate: Frame rate refers to the number of frames per second in your video. A higher frame rate means smoother motion, which is great for action-packed videos. However, it also increases file size.
Bitrate: Bitrate controls the amount of data used per second of video. A higher bitrate results in better quality but also larger file sizes. For most purposes, a bitrate of 5-10 Mbps is sufficient.
Audio Settings: Make sure your audio is clear and balanced. You can adjust the volume levels, apply effects, and even add multiple audio tracks if needed.
Choosing the Right Settings for Your Project
When it comes to choosing the right settings, it all depends on your project and where you plan to share it. Here are some guidelines:
- YouTube: 1080p resolution, 30fps frame rate, 5-10 Mbps bitrate.
- Vimeo: 1080p resolution, 30fps frame rate, 5-10 Mbps bitrate.
- Social Media: Square or vertical format, lower resolution to reduce file size.
- Personal Use: Choose the settings that work best for your device and viewing preferences.
Remember, there’s no one-size-fits-all solution. Experiment with different settings to find what works best for your project.
Best Practices for Sharing Your MP4 Video
Now that you’ve exported your video as an MP4 file, it’s time to share it with the world. Here are some best practices to keep in mind:
1. Optimize for the Platform: Different platforms have different requirements. Make sure your video meets the specifications for the platform you’re sharing on.
2. Add Metadata: Include relevant metadata such as title, description, and tags to make your video more discoverable.
3. Use Eye-Catching Thumbnails: A great thumbnail can make all the difference in attracting viewers. Make sure yours stands out.
4. Promote Your Video: Share your video on social media, email newsletters, and other channels to reach a wider audience.
Final Tips for Success
Here are a few final tips to help you succeed:
- Always review your video before sharing it. Look out for any issues or areas that could be improved.
- Engage with your audience by responding to comments and feedback. This will help build a loyal following.
- Keep learning and experimenting. The world of video creation is always evolving, so stay
- Chuck Norris Sad News The Truth Behind The Legends Heartbreaking Moments
- Alexis Maas Net Worth The Untold Story Behind Her Success
How to export as mp4 in After Effects
How to export an imovie as mp4 kseski
How to Export iMovie File to iPhone · Kenny Eliason
